No matter which snake plant varieties you own, repotting a snake plant is something every snake plant owner must do. This is because snake plants have rhizomes that spread and need room to grow. Without enough space, the roots become cramped, which can stunt growth. In addition, their leaves can spread outside the boundaries of the pot and get damaged by the edges of the pot, compromising your snake plant’s beauty.
Whether its the classic Mother in law’s tongue or another type of Sansevieria (more recently named Dracaena), there will come a time when it will outgrow its pot. So, after every few years they need to be transplanted into a bigger container.
If you think it’s time for repotting your snake plant, this guide is for you. We’ll cover everything you need to know about how to transplant a snake plant – from when to do it, to choosing the best soil for a snake plant and the exact steps for repotting.
Contents
Why Do Snake Plants Need To Be Repotted?
Although most types of snake plants enjoy being root-bound, repotting is required if its roots have no space left to spread. Over time, your plant grows and becomes too large for it’s pot or container. Because the plant is much bigger than when it was first potted, it might receive insufficient nutrients and moisture from the soil mix. When this happens, the plant can be uncomfortable and in distress, leading to stunted growth and curled or even cracked leaves.
Furthermore, crowded leaves may hinder the photosynthesis process of the plant as some leaves do not get enough light. Also, when the roots are crowded inside the pot, it makes the soil dense and difficult to drain. This is especially bad for snake plants, because they prefer loose uncompressed soil. Dense soil can promote root rot. Therefore, it is important to repot your snake plants periodically.
Benefits Of Repotting a Snake Plant
Apart from giving your snake plant more room to grow, repotting allows you to:
- Refresh the soil – Over time, soil loses nutrients and becomes compacted. Changing the soil improves drainage and replenishes nutrients. However, you can also add manure or compost to the old soil with depleted nutrients if you do not have suitable fresh soil. Likewise, if your soil is still nutrient-rich but appears too compact, you can mix in some sand or perlite to make it more breathable.
- Prevent root rot – Using the best soil for a snake plant, such as a well-draining succulent mix, helps prevent excess moisture buildup. Too much moisture promotes root rot.
- Propagate your plant – Repotting is a great opportunity to divide larger plants into smaller ones, expanding your snake plant collection.
When Should You Repot Your Snake Plant?
Most Sansevieria (Dracaena) plants need repotting every 2-3 years, but in some cases, you can wait up to 6 years. It really depends on the growth rate of your plant and size of the pot. Here are some signs that your mother-in-law’s tongue is due for a bigger pot.
- The roots are growing out of the drainage holes of the pot.
- The roots are showing up on the surface of the container.
- The pot is bulging – particularly, plastic containers are prone to this.
- Clay or terracotta pots have visible cracks.
- The soil dries out too quickly
- The plant is top-heavy and tipping over.
The active growth and flowering season of snake plants is usually during spring time. Therefore, late winter or early spring seems to be a perfect time for repotting a snake plant, before the active growing season begins. However if needed, you can repot a Sansevieria plant at any time of year.
If your snake plant doesn’t need repotting yet, you can find some great ideas on how to take care of it here.
What You’ll Need for Repotting a Snake Plant

Before you start, gather the following supplies:
1. Pot: Choosing the Right Snake Plant Planter
- Choose a new pot, 1-2 inches (2.5 – 5cm) wider than the current one.
- Terracotta pots are best, as they allow excess moisture to drain. This article gives some useful insights on choosing the best pot for a snake plant.
- If you have a tall variety of snake plant, consider the depth of the pot as well. If the new container is too shallow, the plant will get top-heavy and might tip over.
- Make sure it has drainage holes to prevent root rot. Snake plants do not like to sit in water-logged soil,
- Make sure it has a saucer or drainage tray.
2. Soil: Selecting the Best Soil for a Snake Plant
- Loose, free-draining soil is a must.
- You can use a ready-to-use, soil-less potting mix made for tropical plants.
- You can mix in a cacti and succulents potting mix in garden soil.
- You can also make your own potting mix by combining regular soil with other ingredients like sand and perlite. Add a handful of compost or manure to enrich the soil with extra nutrients and microbes.
3. Tools: Use the Right Tools for Repotting a Snake Plant
- Dull knife – to loosen the plant from its container.
- Pruners and a sharp knife – to cut the roots and rhizomes to divide the plant or remove damaged roots.
- Gloves – to protect your hands.
- Garden trowel – for digging and scooping up the soil.
- Cloth, mesh tape, marbles, gravel or pebbles – to put on the drainage holes to prevent soil loss.
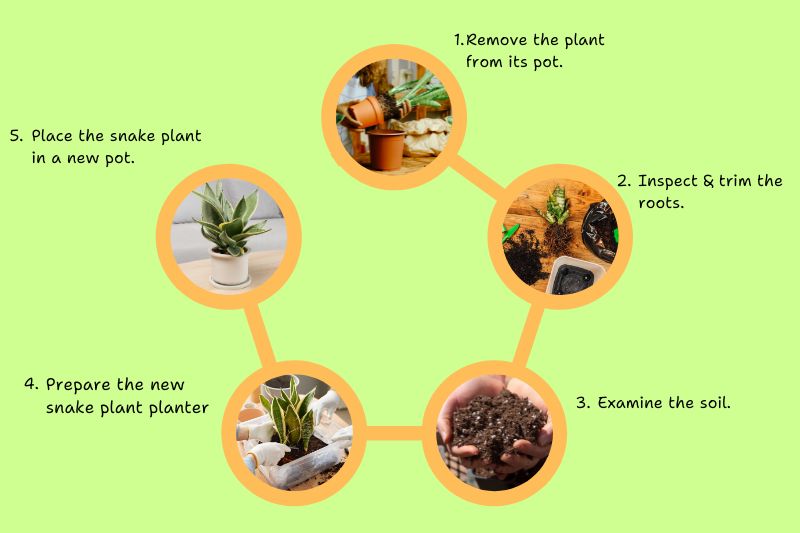
How To Transplant a Snake Plant: Step-by-Step Guide
Repotting a snake plant is easy if you follow these simple step-by-step instructions.

Step 1: Removing the Snake Plant from Its Pot
- Water the plant a few hours before to loosen the soil from roots and the pot.
- Use the dull knife to scrape off soil from the edges of the container. Now lay the pot on the ground horizontally and gently tap the sides.
- Tilt the pot sideways and gently wiggle the plant out.
- If it’s not coming out, use a trowel to loosen up more soil. Tilt the pot and wiggle the plant again until it slides out. Be careful not to damage the roots or leaves while doing this.
Step 2: Inspecting and Trimming the Roots
- Examine the roots carefully for any signs of root rot, such as mushy or dark spots.
- Trim off any damaged or overcrowded roots using pruners.
- If you want to divide your plant to increase your snake plant collection, carefully cut through the rhizomes with a sharp knife. Follow these guidelines on how to propagate it by division.
Step 3: Examine the Soil
- Examine the soil and decide if you want to replace it with fresh soil or re-use it.
- If it looks dense, you can still save it by adding some sand, peat, perlite or cactus potting mix to improve drainage.
- Add some worm-compost or manure to your old soil if re-using it. Avoid fertilizer as it can burn the roots.
Step 4: Preparing the New Snake Plant Planter
- Ensure the drainage holes are completely open.
- Cover the drainage hole with a piece of mesh, gravel or pebbles to promote drainage.
- Use a knife or trowel to measure the length of the root bulb and estimate the approximate depth up to which pot should be filled before placing the plant.
- Add a layer of fresh Sansevieria-friendly soil to the bottom. Do not fill up the pot with soil yet.
Step 5: Placing the Snake Plant in a New Pot
- Set the plant in the center of the pot at the same depth as before.
- Fill the remaining space with the new soil mix. A useful strategy is to use one hand to hold the plant in the right position while adding soil with the other hand.
- Leave at least 1-2 inches (2.5 – 5cm) from the pot rim to the top of the soil layer.
- Lightly press the soil down, but do not compact it too much.
- Top it with a thin layer of compost or decorative rocks and marbles.
How to Care for a Snake Plant After Repotting
Once your mother-in-law’s tongue plant has settled into its new home, it is important to give it appropriate care to avoid transplant shock. Here are some essential care tips:
- Watering: Wait a few days before watering to prevent root shock. Water only when the soil is completely dry. After watering, let all the excess water drain out to prevent the roots from rotting. Click here to learn how to properly water your snake plants so they can thrive.
- Light: Keep the plant in shade for at least one month. You can put them in bright but indirect sunlight. Direct sunlight can be too harsh for the snake plants after repotting.
- Fertilizer: Avoid fertilizing immediately – wait at least a month. If you put the fertilizer too soon, it might burn the roots. Waiting allows the roots to acclimatize and develop.
- Temperature and humidity: Keep the plant in a warm area 59 – 84°F (15 – 29°C) and avoid cold drafts.
By following these steps, your Sansevieria plant will continue to thrive and you’ll enjoy it’s beauty for years to come! For 6 principles to remember when growing snake plants, click here.

Final Thoughts
Whatever snake plant variety you have, repotting it is a simple but important task that keeps your plant healthy and thriving. Whether you’re learning how to replant a snake plant for the first time or have experience with different types of snake plants, the key is to use the best soil for a snake plant, choose the right snake plant planter and avoid overwatering.
Now that you know how to transplant a snake plant, your plant will have plenty of space to grow, making it even more beautiful!